
This article will guide you on how to import your invoices into your Notch dashboard using document intelligence.
With Notch’s OCR technology, you can quickly convert your invoices into data and send them to your customer for payment - all with just a few clicks!
Go to the “Invoices” Tab
From your Notch dashboard, click the "Invoices" tab, and you'll see a sub-tab called "Drafts" appear below it, click on "Drafts".
Email Your pre-generated PDF Invoices to Notch
- To import and parse your invoices, find the text that says "Email your invoices to 123-abc-456-defg-789-hijk0@invoices.notch.financial" at the top of the page in "Drafts".

- Copy this email address, go to your email, create a new message, and paste the address into the recipient field. Then, attach your invoice file(s) and click "Send".

View Your Invoices in the Dashboard
Once you send your invoice to Notch, the system will ingest the invoices and you’ll see them appear in your dashboard shortly after. It may take a few minutes for larger files.
If any information didn't get successfully captured during the processing, a warning icon labeled "Missing" will appear next to the invoice. You can simply fix this by clicking on the invoice line and manually entering or updating the necessary fields inside the editor.


What Happens if the Invoice is Stuck in Processing?
If your invoices cannot be parsed successfully for any reason, you’ll get an email from no-reply@notch.financial with a detailed message.

The OCR technology extracts key information from the original invoice, such as:
-
Customer name
-
Invoice number
-
Invoice date
-
Due date
-
Invoice total
-
Offline payments and credits (if applicable)
To Publish your Invoices for Payment Collection
Our OCR model gets smarter every time you use it! But it’s always a good idea to double-check the parsed data, just to be safe.
Once the invoice details are set, you can click the "Save & Publish" button, or click "Save" if you want to keep editing at a later time. After publishing, the system will notify the customer for payment based on the payment terms and notification settings.
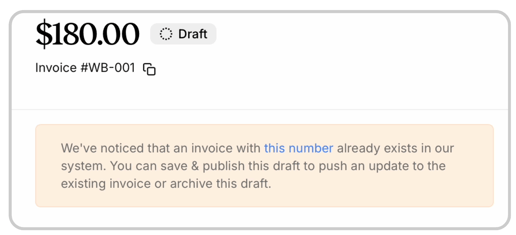
Issuing a revised Invoice
Once you publish the new version, it will replace the old one, and the payable amount in the payment link will be updated. You can still find the original invoice in the "Archived" queue under the "Drafts" tab for your records.
To Edit a Published Invoice
Something doesn’t add up? No worries, you can edit your invoice (even it's already published) —as long as the payment hasn’t been processed yet! Just head to the "Invoices" tab, click on the invoice you want to tweak, and then hit the “...” button in the upper right corner. Select “Edit Invoice,” make your changes, and when you’re done, simply click “Save & Republish” to update it.
The "Edit Invoice" feature is available exclusively for invoices ingested via OCR import.

If the invoice was uploaded via CSV import, it won’t be editable. You can view the event history at the bottom of the invoice to identify how it was imported.
You can find your published invoice in both the "Invoices" tab and the "Drafts" tab. Just remember—only published invoices have valid payment links.
PDF Requirements
Our advanced OCR technology is capable of processing all types of PDF files, including both image-based and text-based formats, as well as larger files containing multiple invoices.